Denote the cateogry of $3$-dimensional manifolds as $\mathcal{M}$, and the convex-hull morphism $f$ is defined as $$ \begin{aligned} f: \mathcal{M} &\rightarrow \mathcal{M} \ M &\mapsto N \end{aligned} $$ where $N$ is the convex hull of $M$. Then $f$ is a smooth morphism/diffeomorphism.
Consider the discrete approximation of any $M \in \mathcal{M}$, denoted as $P$. Regardless how $d$ is concretely define, as far as $d$ is a distance on $\mathcal{M}$, then given a manifold $M$, $\forall \epsilon > 0$, there exists a $g_\theta$ such that $d(M, g_\theta(M)) < \epsilon$, where $g_\theta$ is the discrete approximation and $\theta$ is the parameter of the discrete approximation.
Now suppose that the surface of a cell is a smooth manifold $M$ and its convex hull is a smooth manifold $N$. Let $P$ be the discrete surface of the cell and $Q$ be the discrete convex hull of the cell.
$\forall \epsilon_1 > 0$, $\exists \theta > 0$, such that $d(M, P) < \epsilon_1$, where $P = g_\theta(M)$ and $g_\theta$ is the discrete approximation of $M$.
And denote the discrete approximation of $N$ as $Q’ = g_{\theta}(N)$, then also for the given $\epsilon_2 > 0$, there exists an $\delta > 0$, such that $d(N, Q’) < \epsilon_2$. As far as $\epsilon_1 < \delta$, then $d(M, P) < \epsilon_1 < \delta$, and $d(N, Q’) < \epsilon_2$. Then we have $d(P, Q’) < \epsilon_2$.
And for the other way, since $Q = f(P)$, then $d(Q, Q’) < \epsilon_3$
Denote the space of quaternions by $\mathbb{H}$, which is a 4-dimensional vector space over $\mathbb{R}$ with basis ${\mathbf{1}, \mathbf{i}, \mathbf{j}, \mathbf{k}}$.
$$ q = \left(\begin{matrix} a + id & -b-ic \ b-ic & a-id \end{matrix}\right) = a \mathbf{1} + b \mathbf{i} + c \mathbf{j} + d \mathbf{k} $$
$$ \det q = a^2 + b^2 + c^2 + d^2 = |q|^2 $$
$$ \bar{q} = a \mathbf{1} - b \mathbf{i} - c \mathbf{j} - d \mathbf{k} |q|^2 = q \bar{q} = \bar{q} q $$
Quaternion and rotation
Pure quaternion
$$ p = b \mathbf{i} + c \mathbf{j} + d \mathbf{k} \in \mathbb{R}^3 $$
Samba is a free and open-source re-implementation of the SMB/CIFS network file sharing protocol that allows end users to access files, printers, and other shared resources. Samba 是 SMB/CIFS 网络文件共享协议的免费开源重新实现,允许最终用户访问文件、打印机和其他共享资源。
In this tutorial, we will show how to install Samba on CentOS 7 and configure it as a standalone server to provide file sharing across different operating systems over a network. 在本教程中,我们将展示如何在 CentOS 7 上安装 Samba 并将其配置为独立服务器,以通过网络在不同操作系统之间提供文件共享。
We’ll create the following Samba shares and users. 我们将创建以下 Samba 共享和用户。
Users: 用户:
sadmin - An administrative user with read and write access to all shares. sadmin - 对所有共享拥有读写权限的管理用户。
josh - A regular user with its own private file share. josh - 拥有自己的私人文件共享的普通用户。
Shares: 分享:
users - This share will be accessible with read/write permissions by all users. 用户 - 所有用户都可以通过读/写权限访问此共享。
josh - This share will be accessible with read/write permissions only by users josh and sadmin. josh - 只有用户 josh 和 sadmin 才能通过读/写权限访问此共享。
The file shares will be accessible from all devices on your network. Later in the tutorial, we will also provide detailed instructions on how to connect to the Samba server from Linux, Windows and macOS clients. 文件共享可以从网络上的所有设备访问。在本教程的后面,我们还将提供有关如何从 Linux、Windows 和 macOS 客户端连接到 Samba 服务器的详细说明。
Prerequisites 先决条件
Before you begin, make sure you are logged in to your CentOS 7 system as a user with sudo privileges . 在开始之前,请确保您以具有 sudo 权限的用户身份登录到 CentOS 7 系统。
Installing Samba on CentOS
在 CentOS 上安装 Samba
Samba is available from the standard CentOS repositories. To install it on your CentOS system run the following command: Samba 可从标准 CentOS 存储库中获取。要将其安装在 CentOS 系统上,请运行以下命令:
1
sudo yum install samba samba-client
Once the installation is completed, start the Samba services and enable them to start automatically on system boot: 安装完成后,启动 Samba 服务并使其在系统启动时自动启动:
1
sudo systemctl start smb.service
1
sudo systemctl enable smb.service
The smbd service provides file sharing and printing services and listens on TCP ports 139 and 445. The nmbd service provides NetBIOS over IP naming services to clients and listens on UDP port 137. smbd 服务提供文件共享和打印服务,并侦听 TCP 端口 139 和 445。 nmbd 服务向客户端提供 NetBIOS over IP 命名服务,并侦听 UDP 端口 137。
Configuring Firewall 配置防火墙
Now that Samba is installed and running on your CentOS machine, you’ll need to configure your firewall and open the necessary ports. To do so, run the following commands: 现在 Samba 已安装并在 CentOS 计算机上运行,您需要配置防火墙并打开必要的端口。为此,请运行以下命令:
For easier maintainability and flexibility instead of using the standard home directories (/home/user) all Samba directories and data will be located in the /samba directory. 为了更容易维护和灵活性,所有 Samba 目录和数据都将位于 /samba 目录中,而不是使用标准主目录 ( /home/user )。
Start by creating the /samba directory: 首先创建 /samba 目录:
1
sudo mkdir /samba
Create a new group named sambashare. Later we will add all Samba users to this group. 创建一个名为 sambashare 的新组。稍后我们会将所有 Samba 用户添加到该组中。
1
sudo groupadd sambashare
Set the /samba directory group ownership to sambashare: 将 /samba 目录组所有权设置为 sambashare :
1
sudo chgrp sambashare /samba
Samba uses Linux users and group permission system but it has its own authentication mechanism separate from the standard Linux authentication. We will create the users using the standard Linux useradd tool and then set the user password with the smbpasswd utility. Samba 使用 Linux 用户和组权限系统,但它有自己的身份验证机制,与标准 Linux 身份验证分开。我们将使用标准 Linux useradd 工具创建用户,然后使用 smbpasswd 实用程序设置用户密码。
As we mentioned in the introduction, we’ll create a regular user that will have access to its private file share and one administrative account with read and write access to all shares on the Samba server. 正如我们在简介中提到的,我们将创建一个有权访问其私有文件共享的普通用户和一个对 Samba 服务器上的所有共享具有读写访问权限的管理帐户。
Creating Samba Users 创建 Samba 用户
To create a new user named josh, use the following command: 要创建名为 josh 的新用户,请使用以下命令:
The useradd options have the following meanings: useradd 选项的含义如下:
-M -do not create the user’s home directory. We’ll manually create this directory. -M - 不创建用户的主目录。我们将手动创建此目录。
-d /samba/josh - set the user’s home directory to /samba/josh. -d /samba/josh - 将用户的主目录设置为 /samba/josh 。
-s /usr/sbin/nologin - disable shell access for this user. -s /usr/sbin/nologin - 禁用该用户的 shell 访问。
-G sambashare - add the user to the sambashare group. -G sambashare - 将用户添加到 sambashare 组。
Create the user’s home directory and set the directory ownership to user josh and group sambashare: 创建用户的主目录并将目录所有权设置为用户 josh 和组 sambashare :
1
sudo mkdir /samba/josh
The following command will add the setgid bit to the /samba/josh directory so the newly created files in this directory will inherit the group of the parent directory. This way, no matter which user creates a new file, the file will have group-owner of sambashare. For example, if you don’t set the directory’s permissions to 2770 and the sadmin user creates a new file the user josh will not be able to read/write to this file. 以下命令将向 /samba/josh 目录添加 setgid 位,以便该目录中新创建的文件将继承父目录的组。这样,无论哪个用户创建新文件,该文件的组所有者都是 sambashare 。例如,如果您未将目录的权限设置为 2770 并且 sadmin 用户创建了一个新文件,则用户 josh 将无法读取/写入该文件。
1
sudo chmod 2770 /samba/josh
Add the josh user account to the Samba database by setting the user password: 通过设置用户密码将 josh 用户帐户添加到Samba数据库:
1
sudo smbpasswd -a josh
You will be prompted to enter and confirm the user password. 系统将提示您输入并确认用户密码。
1
2
3
New SMB password:
Retype new SMB password:
Added user josh.
Once the password is set, enable the Samba account by typing: 设置密码后,输入以下命令启用 Samba 帐户:
1
sudo smbpasswd -e josh
1
Enabled user josh.
To create another user repeat the same process as when creating the user josh. 要创建另一个用户,请重复与创建用户 josh 时相同的过程。
Next, let’s create a user and group sadmin. All members of this group will have administrative permissions. Later if you want to grant administrative permissions to another user simply add that user to the sadmin group . 接下来,让我们创建一个用户和组 sadmin 。该组的所有成员都将拥有管理权限。稍后,如果您想向其他用户授予管理权限,只需将该用户添加到 sadmin 组即可。
Create the administrative user by typing: 通过键入以下内容创建管理用户:
The command above will also create a group sadmin and add the user to both sadmin and sambashare groups. 上面的命令还将创建一个组 sadmin 并将用户添加到 sadmin 和 sambashare 组中。
Set a password and enable the user: 设置密码并启用用户:
1
sudo smbpasswd -a sadmin
Next, create the Users share directory: 接下来,创建 Users 共享目录:
This directory will be accessible by all authenticated users. The following command configures write/read access to members of the sambashare group in the /samba/users directory: 所有经过身份验证的用户都可以访问此目录。以下命令配置对 /samba/users 目录中 sambashare 组成员的写/读访问权限:
1
sudo chmod 2770 /samba/users
Configuring Samba Shares
配置 Samba 共享
Open the Samba configuration file and append the sections: 打开 Samba 配置文件并附加以下部分:
1
sudo nano /etc/samba/smb.conf
/etc/samba/smb.conf
1
2
3
4
5
6
7
8
9
10
11
12
13
14
15
[users]
    path = /samba/users
    browseable = yes
    read only = no
    force create mode = 0660
    force directory mode = 2770
    valid users = @sambashare @sadmin

[josh]
    path = /samba/josh
    browseable = no
    read only = no
    force create mode = 0660
    force directory mode = 2770
    valid users = josh @sadmin
Copy
The options have the following meanings: 选项含义如下:
[users] and [josh] - The names of the shares that you will use when logging in. [users] 和 [josh] - 登录时将使用的共享名称。
path - The path to the share. path - 共享的路径。
browseable - Whether the share should be listed in the available shares list. By setting to no other users will not be able to see the share. browseable - 共享是否应列在可用共享列表中。通过设置为 no ,其他用户将无法看到共享。
read only - Whether the users specified in the valid users list are able to write to this share. read only - valid users 列表中指定的用户是否能够写入此共享。
force create mode - Sets the permissions for the newly created files in this share. force create mode - 设置此共享中新创建的文件的权限。
force directory mode - Sets the permissions for the newly created directories in this share. force directory mode - 设置此共享中新创建的目录的权限。
valid users - A list of users and groups that are allowed to access the share. Groups are prefixed with the @ symbol. valid users - 允许访问共享的用户和组的列表。组以 @ 符号为前缀。
For more information about available options see the Samba configuration file documentation page. 有关可用选项的更多信息,请参阅 Samba 配置文件文档页面。
Once done, restart the Samba services with: 完成后,使用以下命令重新启动 Samba 服务:
1
sudo systemctl restart smb.service
In the following sections, we will show you how to connect to a Samba share from Linux, macOS and Windows clients. 在以下部分中,我们将向您展示如何从 Linux、macOS 和 Windows 客户端连接到 Samba 共享。
Connecting to a Samba Share from Linux
从 Linux 连接到 Samba 共享
Linux users can access the samba share from the command line, using the file manager or mount the Samba share. Linux 用户可以使用文件管理器从命令行访问 samba 共享或挂载 Samba 共享。
Using the smbclient client
使用 smbclient 客户端
smbclient is a tool that allows you to access Samba from the command line. The smbclient package is not pre-installed on most Linux distros so you will need to install it with your distribution package manager. smbclient 是一个允许您从命令行访问 Samba 的工具。大多数 Linux 发行版上都没有预安装 smbclient 软件包,因此您需要使用发行版软件包管理器来安装它。
To install smbclient on Ubuntu and Debian run: 要在 Ubuntu 和 Debian 上安装 smbclient ,请运行:
1
sudo apt install smbclient
To install smbclient on CentOS and Fedora run: 要在 CentOS 和 Fedora 上安装 smbclient ,请运行:
1
sudo yum install samba-client
The syntax to access a Samba share is as follows: 访问Samba共享的语法如下:
For example to connect to a share named josh on a Samba server with IP address 192.168.121.118 as user josh you would run: 例如,要以用户 josh 身份连接到 IP 地址为 192.168.121.118 的 Samba 服务器上名为 josh 的共享,您可以运行:
1
smbclient //192.168.121.118/josh -U josh
You will be prompted to enter the user password. 系统将提示您输入用户密码。
1
Enter WORKGROUP\josh's password:
Once you enter the password you will be logged into the Samba command line interface. 输入密码后,您将登录到 Samba 命令行界面。
1
2
Try "help" to get a list of possible commands.
smb: \>
Mounting the Samba share
挂载 Samba 共享
To mount a Samba share on Linux first you need to install the cifs-utils package. 要在 Linux 上挂载 Samba 共享,您首先需要安装 cifs-utils 软件包。
On Ubuntu and Debian run: 在 Ubuntu 和 Debian 上运行:
1
sudo apt install cifs-utils
On CentOS and Fedora run: 在 CentOS 和 Fedora 上运行:
1
sudo yum install cifs-utils
Next, create a mount point: 接下来,创建一个挂载点:
1
sudo mkdir /mnt/smbmount
Mount the share using the following command: 使用以下命令挂载共享:
1
sudo mount -t cifs -o username=username //samba_hostname_or_server_ip/sharename /mnt/smbmount
For example to mount a share named josh on a Samba server with IP address 192.168.121.118 as user josh to the /mnt/smbmount mount point you would run: 例如,要将 IP 地址为 192.168.121.118 的 Samba 服务器上名为 josh 的共享作为用户 josh 挂载到 /mnt/smbmount 挂载点,您可以跑步:
1
sudo mount -t cifs -o username=josh //192.168.121.118/josh /mnt/smbmount
You will be prompted to enter the user password. 系统将提示您输入用户密码。
1
Password for josh@//192.168.121.118/josh: ********
Using GUI 使用图形用户界面
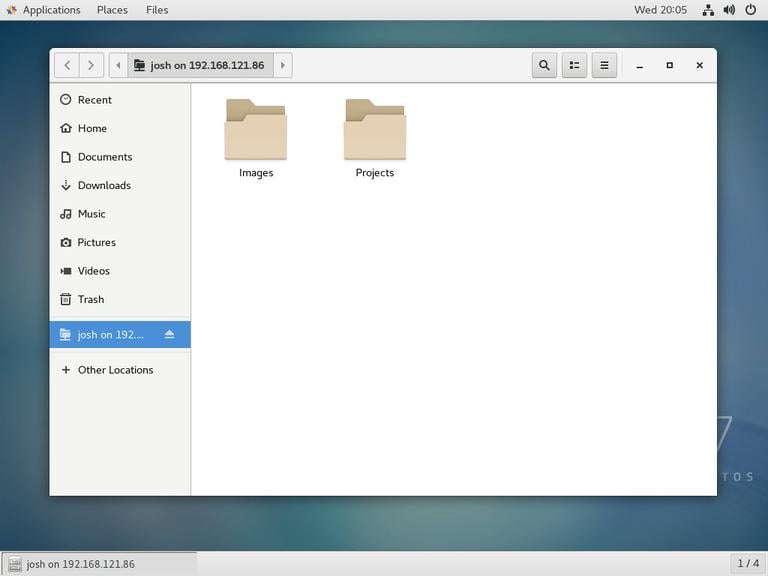
Files, the default file manager in Gnome has a built-in option to access Samba shares. 文件,Gnome 中的默认文件管理器有一个内置选项来访问 Samba 共享。
Open Files and click on “Other Locations” in the sidebar. 打开文件并单击侧栏中的“其他位置”。
In “Connect to Server”, enter the address of the Samba share in the following format smb://samba_hostname_or_server_ip/sharename. 在“连接到服务器”中,按以下格式输入 Samba 共享的地址 smb://samba_hostname_or_server_ip/sharename 。
Click “Connect” and the following screen will appear: 单击“连接”,将出现以下屏幕:
Select “Registered User”, enter the Samba username and password and click “Connect”. 选择“注册用户”,输入Samba用户名和密码,然后单击“连接”。
The files on the Samba server will be shown. 将显示 Samba 服务器上的文件。
Connecting to a Samba Share from macOS
从 macOS 连接到 Samba 共享
In macOS, you can access the Samba Shares either from the command line or using the default macOS file manager Finder. The following steps show how to access the share using Finder. 在 macOS 中,您可以从命令行或使用默认的 macOS 文件管理器 Finder 访问 Samba 共享。以下步骤显示如何使用 Finder 访问共享。
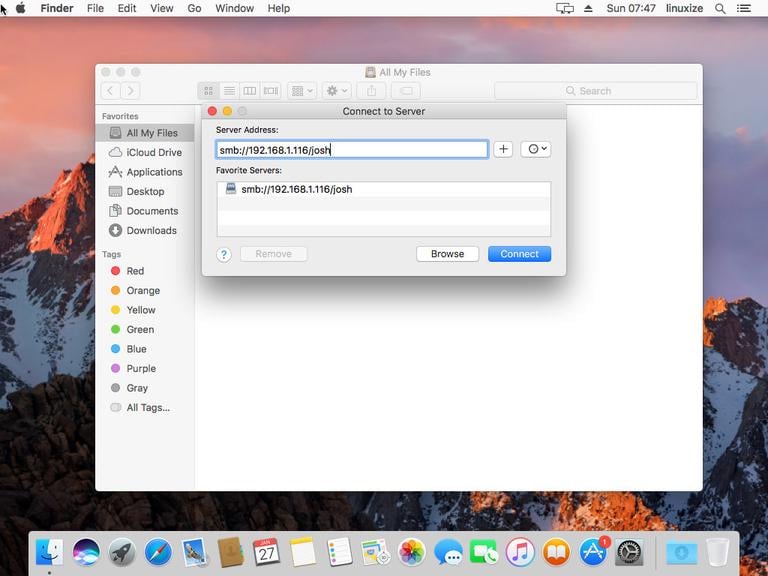
Open “Finder”, select “Go” and click “Connect To”. 打开“Finder”,选择“前往”并单击“连接到”。
In “Connect To”, enter the address of the Samba share in the following format smb://samba_hostname_or_server_ip/sharename. 在“连接到”中,按以下格式输入 Samba 共享的地址 smb://samba_hostname_or_server_ip/sharename 。
Click “Connect” and the following screen will appear: 单击“连接”,将出现以下屏幕:
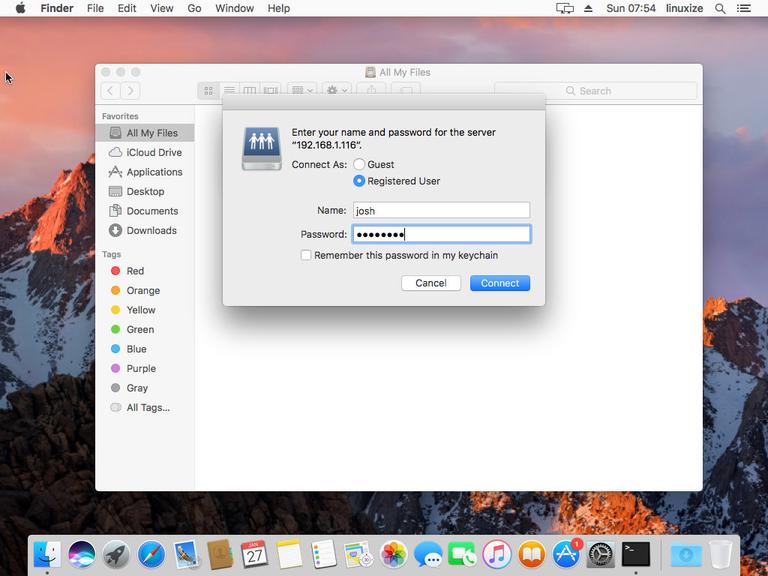
Select “Registered User”, enter the Samba username and password and click “Connect”. 选择“注册用户”,输入Samba用户名和密码,然后单击“连接”。
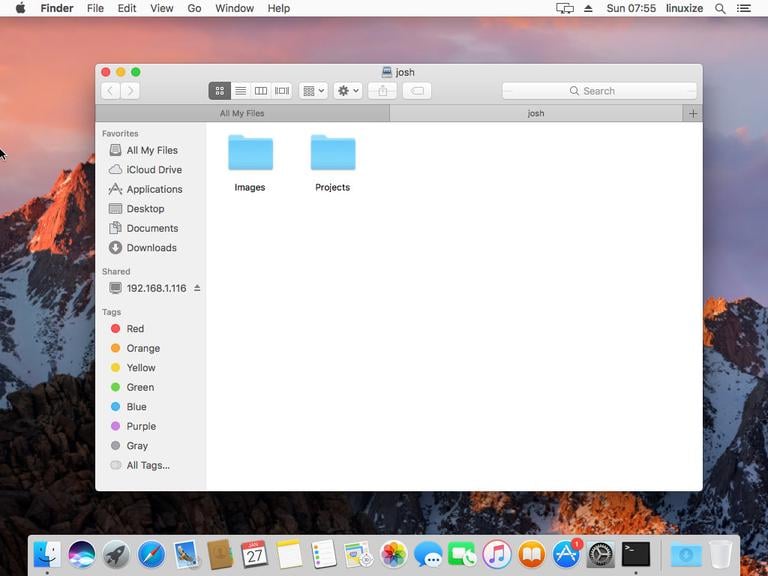
The files on the Samba server will be shown. 将显示 Samba 服务器上的文件。
Connecting to a Samba Share from Windows
从 Windows 连接到 Samba 共享
Windows users also have an option to connect to the Samba share from both command line and GUI. The steps below show how to access the share using the Windows File Explorer. Windows 用户还可以选择从命令行和 GUI 连接到 Samba 共享。以下步骤显示如何使用 Windows 文件资源管理器访问共享。
Open up File Explorer and in the left pane right-click on “This PC”. 打开文件资源管理器,然后在左侧窗格中右键单击“此电脑”。
Select “Choose a custom network location” and then click “Next”. 选择“选择自定义网络位置”,然后单击“下一步”。
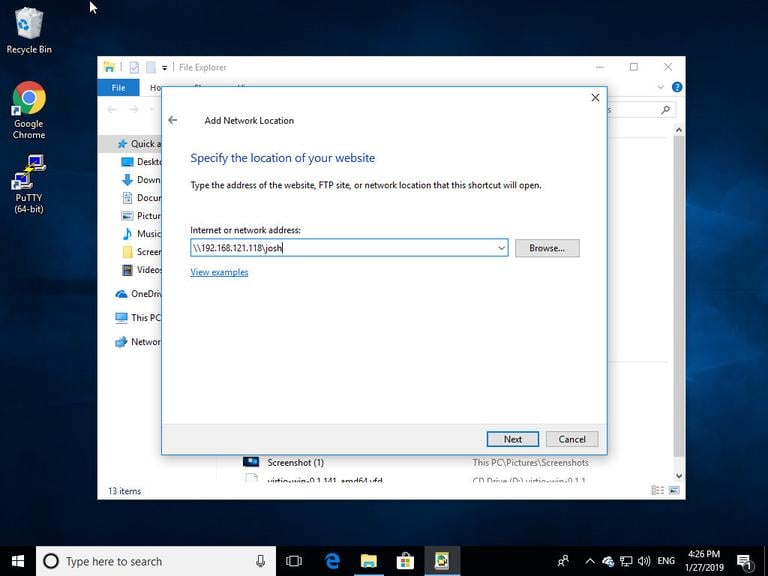
In “Internet or network address”, enter the address of the Samba share in the following format \\samba_hostname_or_server_ip\sharename. 在“Internet 或网络地址”中,按以下格式输入 Samba 共享的地址 \\samba_hostname_or_server_ip\sharename 。
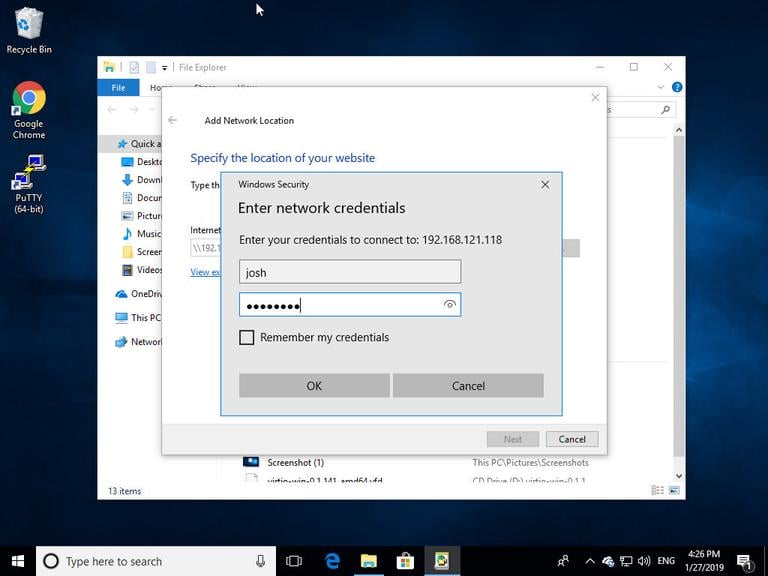
Click “Next” and you will be prompted to enter the login credentials as shown below: 单击“下一步”,系统将提示您输入登录凭据,如下所示:
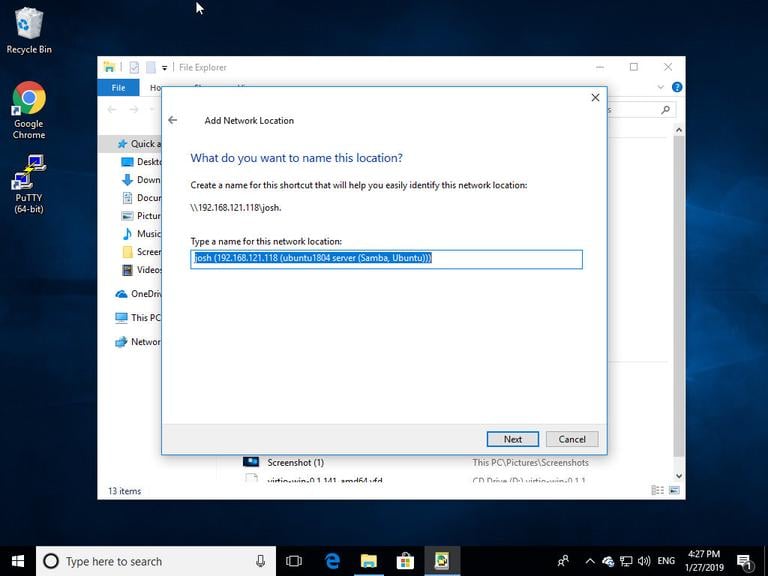
In the next window, you can type a custom name for the network location. The default one will be picked up by the Samba server. 在下一个窗口中,您可以为网络位置键入自定义名称。 Samba 服务器将采用默认值。
Click “Next” to move to the last screen of the connection setup wizard. 单击“下一步”移至连接设置向导的最后一个屏幕。
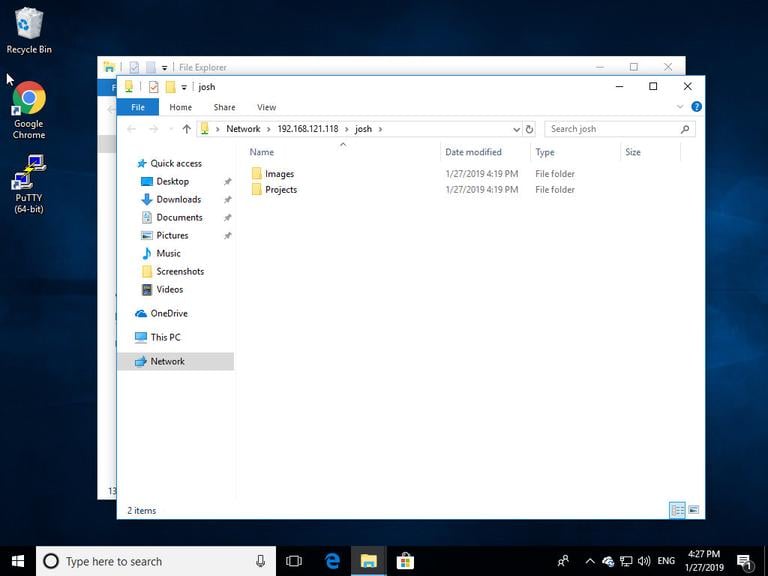
Click “Finish” and the files on the Samba server will be shown. 单击“完成”,将显示 Samba 服务器上的文件。
Conclusion 结论
In this tutorial, you have learned how to install a Samba server on CentOS 7 and create different types of shared and users. We have also shown you how to connect to the Samba server from Linux, macOS and Windows devices. 在本教程中,您学习了如何在 CentOS 7 上安装 Samba 服务器并创建不同类型的共享和用户。我们还向您展示了如何从 Linux、macOS 和 Windows 设备连接到 Samba 服务器。
Open Terminal application and clone this repository by running this command: git clone https://github.com/pookjw/SidecarPatcher
Run main.swift: sudo swift SidecarPatcher/main.swift
You will need to enter your macOS password.
Ignore warnings. If you encounter error and you don’t know how to fix, upload a log to Issue. (I can’t reply all issues because I don’t know all.)
About xcrun error and crashing many apps after rebooting: #4
How to revert
Simplest Method (1)
Reinstall your macOS using macOS Combo Update. You can download macOS Combo Update from here. For example, if you’re using macOS Catalina 10.15.4, download macOS Catalina 10.15.4 Combo Update. It won’t erase your data and it will just reinstall the system.
Simplest Method (2)
Reinstall your macOS using Install macOS Catalina.app. Install it without erasing your disk it won’t erase your data and it will just reinstall the system.
Clicking on icon can not prompt the password input window;
gtk error
Try
Same problem here. Ubuntu 22.04. 这里同样的问题。乌班图22.04。 Fixed by downgrading to 3.2.3. 通过降级至 3.2.3 修复。 Removed timeshift and rsync via apt. 通过 apt 删除了时移和 rsync。 Then: 然后: sudo apt-get install rsync=3.2.3-8ubuntu3 Put rsync on hold: 暂停 rsync: sudo apt-mark hold rsync
Reinstall timeshift via apt. 通过 apt 重新安装 timeshift。
On the basis that timeshift uses rsync under the hood, it’s important to note that, 基于时移在底层使用 rsync 的基础上,需要注意的是,
the paths in a filter file such as the one you show are relative to the root of the transfer 过滤器文件中的路径(例如您显示的路径)相对于传输的根目录
the include/exclude operations work from the top down with the first match being applied. 包含/排除操作从上到下进行,并应用第一个匹配项。
If you are transferring from /home/nils then all the paths in the filter file start there - even if they begin with /. On the other hand, if you are using timeshift to backup from / then the paths should be correct. 如果您从 /home/nils 传输,则过滤器文件中的所有路径都从那里开始 - 即使它们以 / 开头。另一方面,如果您使用时移从 / 进行备份,则路径应该是正确的。
Note that the first line tells rsync (timeshift) to include everything under /home/nils. Any later pattern under /home/nils - such as /home/nils/Dropbox/ - will never be matched. Change the order to exclude files and directories before you specify a broader set for inclusion. 请注意,第一行告诉 rsync (时移)包含 /home/nils 下的所有内容。 /home/nils 下的任何后续模式 - 例如 /home/nils/Dropbox/ - 将永远不会匹配。在指定更广泛的包含集之前,更改排除文件和目录的顺序。
Consequently you need to reorder your example like this: 因此,您需要像这样重新排序您的示例: